
Soft & Buttery Garlic Rolls

Pillowy, buttery rolls enriched with garlic folded into the dough and finished with a glossy garlic-butter brush—perfect for family dinners, brunch, or holiday tables.
Why You'll Love This Recipe
- Soft, tender crumb achieved with warm milk, melted butter, and a brief knead—ready to serve in about 2 hours from start to finish.
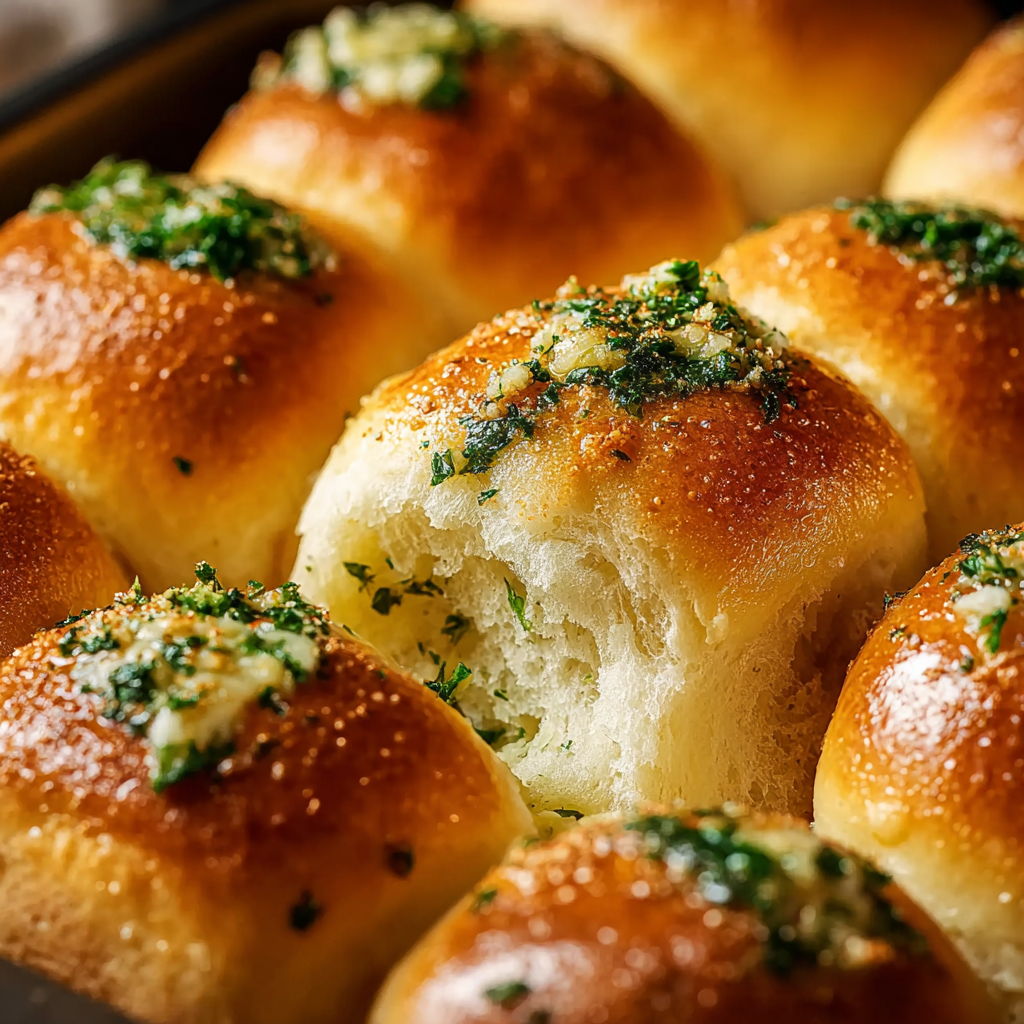
- Garlic is folded into the dough and used in the finishing brush so flavor is present in every bite, not only on the surface.
- Uses pantry staples: all-purpose flour, dry yeast, sugar, and simple fresh ingredients like garlic and parsley.
- Make-ahead friendly—the dough holds well in the refrigerator for up to 24 hours for slow fermentation and deeper flavor.
- Great for feeding a crowd: the yield makes about 12 generous rolls that reheated stay soft for days when wrapped properly.
- Adaptable for dietary needs in simple ways, such as using plant-based butter for a dairy-free version (note: taste and texture will vary).
I remember the first time I shaped these for guests: the aroma filled the house and people kept coming back for more even after the main meal. Over time I learned to add a little fresh parsley to brighten the butter brush and to never skip the final glaze of melted butter—it gives the rolls a bakery-like shine and flavor. These small rituals make the process feel special.
Ingredients
- All-purpose flour: 3½ cups, plus extra for dusting. Look for unbleached flour for better flavor and consistency; this provides the structure and chew of the rolls.
- Granulated sugar: 2–3 tablespoons. Sugar feeds the yeast and gives a touch of caramelization on the crust; I usually use 2 tablespoons for a less sweet roll.
- Instant yeast: 2¼ teaspoons (one packet). Instant yeast is convenient and mixes directly into dry ingredients for reliable rise.
- Salt: 1 teaspoon. Balances flavor—use fine sea salt or kosher salt adjusted to taste.
- Milk: 1 cup warmed (whole or 2%). Warm to about 100–110°F to activate yeast without killing it; whole milk gives a richer crumb.
- Unsalted butter: 4½ tablespoons melted for the dough plus extra for brushing. Use a high-quality brand like Plugrá or Kerrygold for flavor.
- Large egg: 1, room temperature. Adds richness and helps create a tender interior.
- Fresh garlic: 2 tablespoons finely minced for folding into the dough and 1 tablespoon for the finishing brush. Fresh cloves provide brightness that powder can’t match.
- Fresh parsley or herbs: 3 tablespoons chopped, optional. Adds a fresh contrast to the buttery garlic and looks pretty when sprinkled on top.
- Finishing salt (optional): flaky sea salt for sprinkling after brushing, about a pinch per roll, to add texture and a final pop of flavor.
Instructions
Prepare the Dough: Combine 3½ cups flour, 2–3 tablespoons sugar, 2¼ teaspoons instant yeast, and 1 teaspoon salt in a large bowl. Whisk to distribute. Warm 1 cup milk to 100–110°F, stir in 4½ tablespoons melted butter and 1 large beaten egg, then pour into the dry mix. Add 2 tablespoons minced garlic. Mix until a shaggy dough forms. If using a stand mixer, knead on low for 6–8 minutes; by hand, turn onto a floured surface and knead 8–10 minutes until smooth and slightly tacky. Visual cue: dough should stretch thin without tearing when gently pulled. First Rise: Place the dough in a lightly oiled bowl, turning once to coat. Cover with plastic wrap or a damp towel and leave in a warm draft-free spot until doubled, about 60–75 minutes. For deeper flavor, refrigerate for an overnight slow rise—bring back to room temperature and allow to puff before shaping. Shape the Rolls: Punch the dough down gently to release air. Turn onto a lightly floured surface and divide into 12 equal pieces (about 2 ounces each). Shape each piece into a tight ball by pulling edges under and rolling on the counter. Arrange balls in a greased 9x13-inch baking pan or two smaller pans, leaving a little space between each for expansion. Second Rise: Cover the pan loosely and let the rolls rise until nearly doubled and just touching, 30–45 minutes depending on room temperature. They should look puffy and hold a slight indentation when gently pressed. Bake and Finish: Preheat oven to 375°F. Bake rolls for 18–22 minutes until golden brown and internal temperature reaches about 190°F in the center. While baking, melt 2 tablespoons butter with 1 tablespoon minced garlic and 1 tablespoon chopped parsley for the brush. As soon as the rolls come out, brush generously with the garlic-butter and sprinkle optional flaky sea salt. Cool slightly in pan before serving.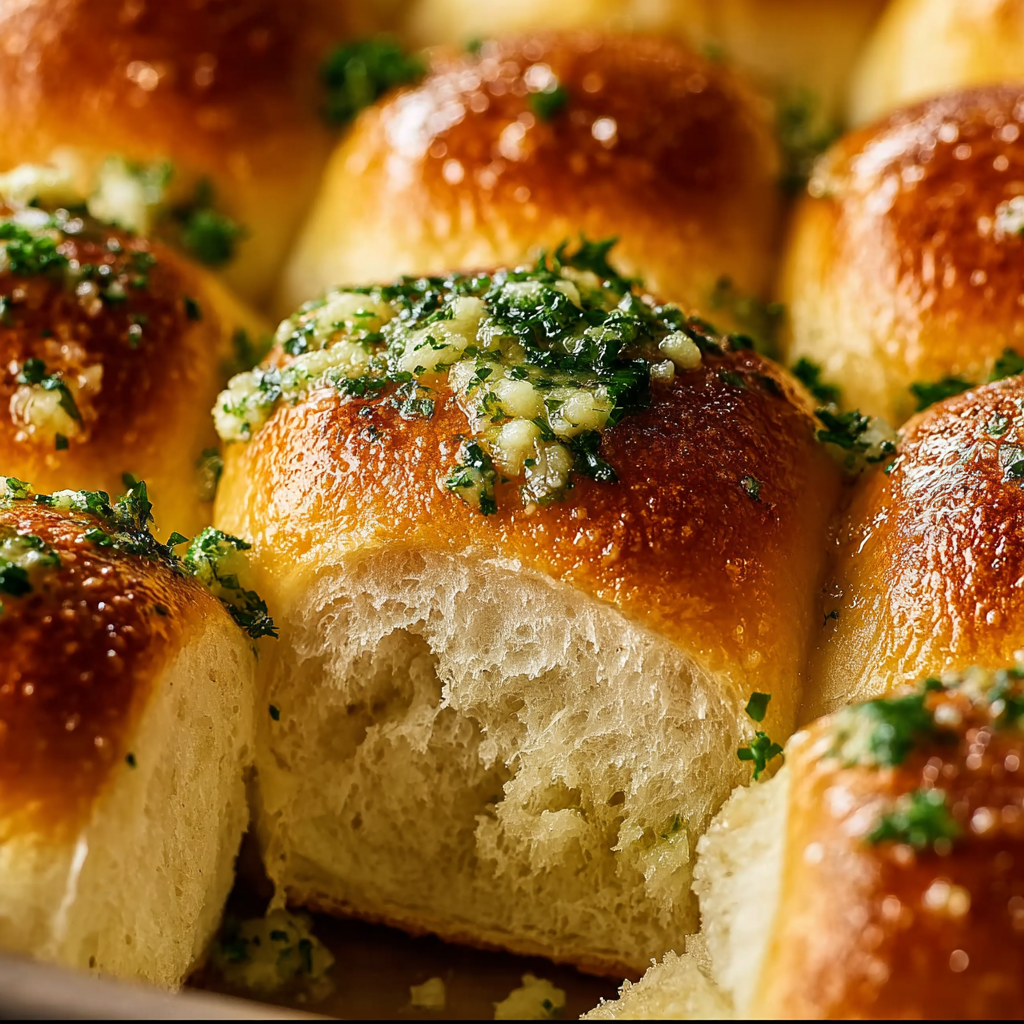
You Must Know
- These rolls freeze very well: par-bake for 10 minutes, cool, then freeze in a single layer. Finish baking from frozen, adding a few minutes to time.
- Best stored in an airtight container at room temperature for up to 2 days; for longer storage refrigerate up to 5 days or freeze up to 3 months.
- High in simple carbohydrates and fat due to butter and flour—pair with protein-rich mains to balance a meal.
- For an extra tender crumb, avoid over-kneading; stop when dough is smooth and springs back slowly when pressed.
My favorite part is brushing the hot rolls with butter right out of the oven; that moment turns a homemade roll into something that resembles a bakery item. Friends who’ve tried them often ask for the method behind the soft texture—most credit goes to the warm milk and short, controlled kneading. I love that they work both as an everyday accompaniment and for more festive tables without much fuss.

Storage Tips
Store cooled rolls in an airtight container or resealable bag at room temperature for up to 48 hours to keep them soft. For longer storage, wrap individual rolls in plastic and place in a freezer-safe bag; they keep for up to three months. To reheat, defrost at room temperature if frozen, then warm in a 325°F oven for 8–12 minutes wrapped in foil to prevent over-browning, or microwave individual rolls for 12–20 seconds wrapped in a damp paper towel to restore softness. Avoid refrigeration for more than a few days as it firms the crumb.
Ingredient Substitutions
Use plant-based milk and vegan butter to make a dairy-free version; results will be slightly less rich but still tender. Replace all-purpose flour with a mix of 90% all-purpose and 10% bread flour for a chewier texture or use 100% bread flour for stronger gluten development and taller rolls. For lower-sodium options, reduce added salt to ½ teaspoon and finish with a light sprinkle of flaky salt only on some rolls. If fresh garlic is unavailable, use ¾ teaspoon garlic powder in the dough and 1 teaspoon in the finishing butter but note the flavor will be less vibrant.
Serving Suggestions
Serve these rolls warm with butter or alongside soups, stews, roasted chicken, or a salad for a complete meal. For brunch, split and toast halves with melted butter and a sprinkle of parsley, or use leftover rolls for sliders stuffed with pulled pork. Garnish with extra chopped parsley and a few flakes of sea salt for a restaurant-style presentation. They’re also ideal for holiday spreads—arrange them in a basket lined with a cloth napkin to keep them warm and inviting.
Cultural Background
Soft enriched rolls have roots across many baking traditions where milk, butter, and eggs are used to create tender breads—think brioche or dinner roll traditions in Europe. The addition of garlic and herbs leans into Mediterranean and American comfort cooking where savory breads accompany main dishes. Over time home cooks have adapted classic enriched doughs by folding in flavors like garlic so that rolls carry more of the meal’s character rather than serving purely as a neutral vehicle.
Seasonal Adaptations
In spring and summer, brighten the butter brush with lemon zest and fresh basil instead of parsley. For autumn and winter, mix finely grated roasted garlic into the dough for a deeper, sweeter garlic flavor and swap parsley for chopped rosemary or thyme. Around holidays add 1 teaspoon of honey to the dough for a subtle glaze and a touch of warmth; the fragrance pairs beautifully with roast meats and seasonal vegetables.
Meal Prep Tips
Prepare the dough the night before and refrigerate after the first rise to allow slow fermentation—this deepens flavor and makes morning baking effortless. Divide and shape rolls, then cover and refrigerate the pan overnight; let them come to room temperature for 30–60 minutes before baking. For quick weeknight dinners, freeze shaped rolls on a sheet pan then transfer to a bag; when needed, bake from frozen with an extra 5–8 minutes. Label containers with dates and reheating instructions to simplify busy nights.
These rolls encapsulate the comfort of baking at home with just enough technique to feel accomplished but not overwhelmed. Make them your own by adjusting herbs, trying different finishing salts, or experimenting with enriched dough variations—once you get the rhythm of mixing, rising, and shaping, they’ll become a staple you return to again and again.
Pro Tips
Warm the milk to 100–110°F; too hot will kill yeast, too cold slows rising.
Knead until the dough is smooth and elastic but not dry—stop when it stretches without tearing.
Brush with garlic-butter immediately after baking to lock in gloss and aroma.
For even browning, rotate the pan halfway through baking if your oven has hot spots.
Weigh or measure dough pieces equally for uniform rolls that bake evenly.
This nourishing soft & buttery garlic rolls recipe is sure to be a staple in your kitchen. Enjoy every moist, high protein slice — it is perfect for breakfast or as a wholesome snack any time.
FAQs about Recipes
Can I make the dough ahead of time?
Yes. Refrigerate dough after the first rise for up to 24 hours for a slower fermentation and fuller flavor. Bring it to room temperature and let it puff before shaping and baking.
How do I store leftovers?
Freeze baked rolls in a single layer, then transfer to a bag. Reheat in a 325°F oven wrapped in foil for 8–12 minutes.
Tags
Soft & Buttery Garlic Rolls
This Soft & Buttery Garlic Rolls recipe makes perfectly juicy, tender, and flavorful steak every time! Serve with potatoes and a side salad for an unforgettable dinner in under 30 minutes.
Ingredients
Dough
Garlic Butter Brush
Instructions
Prepare the Dough
Whisk flour, sugar, yeast, and salt in a large bowl. Warm milk and combine with melted butter and beaten egg, then add minced garlic. Mix into the dry ingredients until a shaggy dough forms. Knead by hand for 8–10 minutes or 6–8 minutes on low in a stand mixer until smooth and elastic.
First Rise
Place dough in an oiled bowl, turning to coat. Cover and let rise in a warm spot until doubled, about 60–75 minutes. For deeper flavor, refrigerate overnight after this first rise and complete shaping the next day.
Shape the Rolls
Punch down dough and divide into 12 equal pieces. Shape each into a tight ball and arrange in a greased 9x13-inch pan with space for expansion. Cover loosely for the second rise.
Second Rise
Let the shaped rolls rise until nearly doubled and just touching, about 30–45 minutes. They should appear puffy and spring back slowly when pressed.
Bake and Finish
Preheat oven to 375°F. Bake for 18–22 minutes until golden and an internal temperature reaches about 190°F. Melt butter with minced garlic and parsley to brush over hot rolls, finishing with optional flaky sea salt.
Last Step: Please leave a rating and comment letting us know how you liked this recipe! This helps our business to thrive and continue providing free, high-quality recipes for you.
Nutrition
Did You Make This?
Leave a comment & rating below or tag
@easywhiskrecipes on social media!
Categories:
You might also like...

Instant Pot Creamy Chicken and Rice
A quick and comforting one pot dinner of tender chicken, creamy rice, and vegetables cooked together in the Instant Pot for an easy weeknight meal.

Cinnamon Roll Pancake Stacks
Fluffy pancakes swirled with a warm cinnamon filling and finished with a silky cream cheese glaze. Perfect for weekend brunches and cozy mornings.

Caramel Apple Cheesecake Bars
Buttery graham crust, creamy cheesecake, spiced Granny Smith apples, crunchy streusel, and a ribbon of homemade caramel — perfect dessert bars for gatherings.
Did You Make This?
Leave a comment & rating below or tag @easywhiskrecipes on social media!
Rate This Recipe
Share This Recipe
Enjoyed this recipe? Share it with friends and family, and don't forget to leave a review!
Comments (1)
This recipe looks amazing! Can't wait to try it.
Comments are stored locally in your browser. Server comments are displayed alongside your local comments.

Hi, I'm Sophie!
What's Popular

30-Minute Meals!
Join to receive our email series which contains a round-up of some of our quick and easy family favorite recipes.