
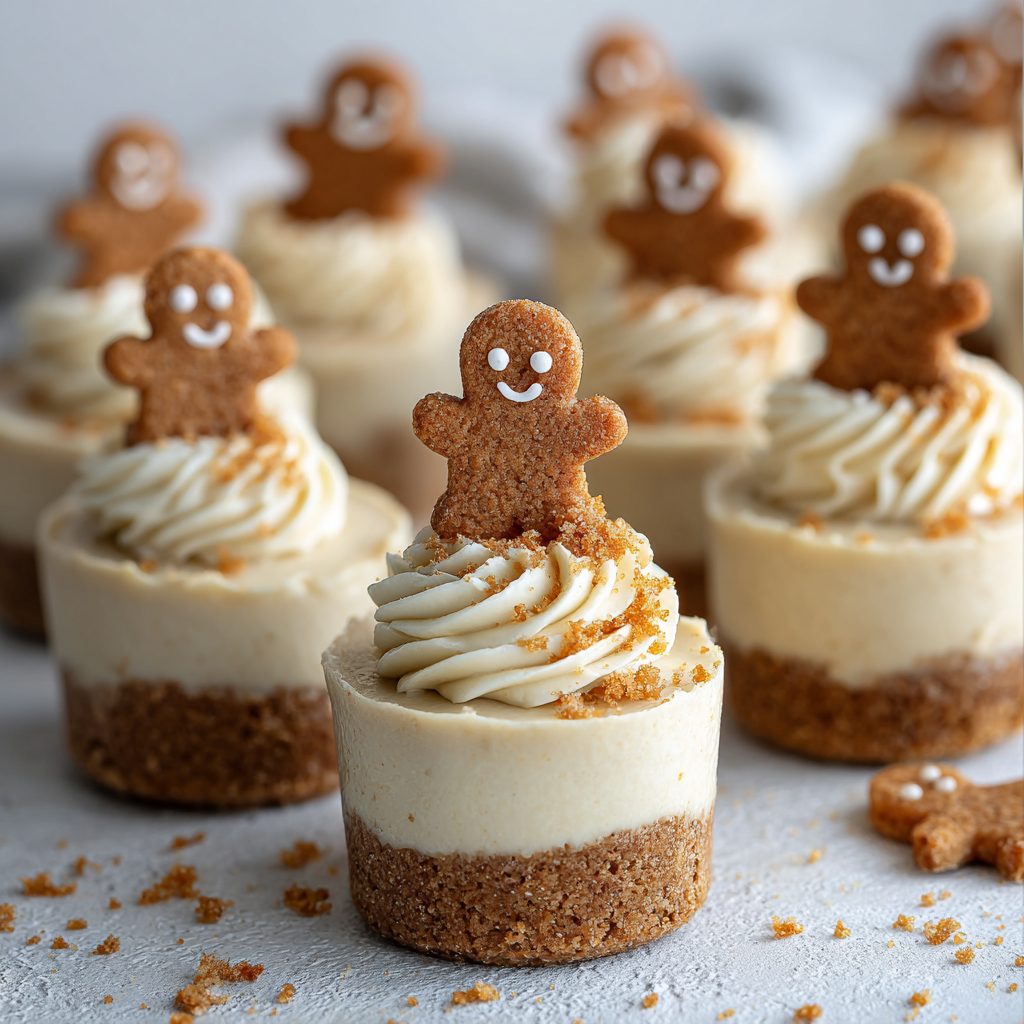
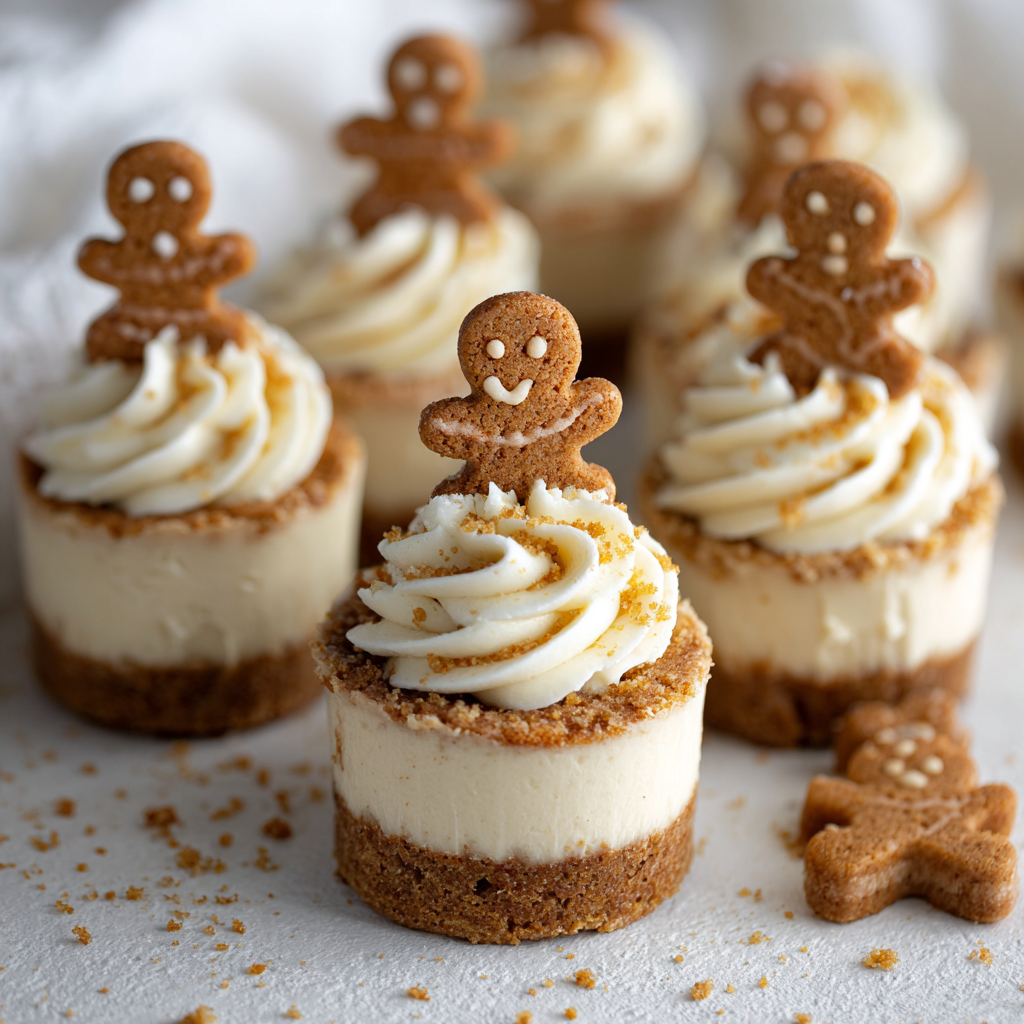
No-Bake Gingerbread Cheesecake Cups

A simple, festive no-bake dessert—gingerbread cookie crust topped with a spiced cream cheese filling, chilled into individual serving cups for elegant ease.
This no-bake gingerbread cheesecake cups recipe became my favorite holiday shortcut the first winter I needed a dessert that looked special but didn’t require an oven. I discovered the idea while trying to balance a crowded family schedule with our annual cookie exchange: I had leftover gingerbread cookies and a block of cream cheese begging for purpose. The combination of crunchy, spiced crumbs and a silky, lightly-sweetened cream cheese filling is the kind of contrast that brings people to the table—warm aroma notes of ginger and cinnamon from the crust and a cool, luscious bite from the filling. It’s fuss-free, fast to assemble, and perfectly suited for parties when you need individual portions that travel well.
What makes these cups memorable is the texture play and the simplicity of ingredients. The crust presses into compact bases that hold their shape, while the filling folds in whipped cream for airiness without overwhelming sweetness. I first served these at a potluck; neighbors loved that each cup felt like a mini-dessert spooned from a bakery case. Because there’s no baking, this is a great recipe for cooks who want big flavor with minimal hands-on time. The recipe scales easily and adapts to gluten-free or dairy-free swaps if needed, but this version uses classic ingredients for that creamy, familiar finish.
Why You'll Love This Recipe
- Ready in under 30 minutes of active time—assemble the cups in about 20 minutes, then chill for set-up time while you tend to other tasks.
- Uses pantry staples and store-bought gingerbread cookies for the crust, which keeps the ingredient list short and shopping simple.
- Individual servings make presentation effortless and simplify portion control for parties, gifting, or meal prep.
- No oven required—ideal for holiday kitchens, summer gatherings, or when you want dessert without heating the house.
- Flexible: easily convert to gluten-free or flavored variations (molasses, orange zest, or maple) with small swaps.
- Light yet indulgent—folding whipped cream into the cream cheese keeps the texture airy so the cups feel elegant, not heavy.
In our home these cups became the dessert I bring to holiday brunches. My sister calls them "portable cheer," and my kids love adding little dollops of extra whipped cream before devouring them. I’ve learned small tricks along the way—press the crust firmly but not overly compacted, and chill long enough so the filling firms just right for clean spoons. It’s a dessert that rewards attention to simple details.
Ingredients
- Gingerbread cookie crumbs (1 1/2 cups): Crush store-bought gingerbread cookies in a food processor or place them in a zip bag and pound with a rolling pin. Look for cookies with molasses or real ginger for the most authentic spice profile; they give the crust warm depth and a slightly chewy texture when combined with butter.
- Unsalted butter (1/4 cup, melted): Melting and cooling slightly before combining helps bind crumbs without making the mixture greasy. Unsalted lets you control the salt level; add a pinch if your cookies are very mild.
- Cream cheese (16 oz, softened): Full-fat cream cheese gives the richest flavor and best mouthfeel. Leave it at room temperature for at least 30 minutes for a smooth, lump-free filling. Brands like Philadelphia provide consistent texture.
- Powdered sugar (1/2 cup): Confectioners’ sugar dissolves quickly into the cream cheese for silky sweetness. Sift if you notice any lumps.
- Ground ginger (1 teaspoon): Boosts the ginger note from the crust; use fresh ground ginger for a brighter, spicier finish.
- Ground cinnamon (1/2 teaspoon): Adds warmth and pairs with ginger for the classic holiday spice combo.
- Vanilla extract (1 teaspoon): Rounds the spices and lifts the dairy notes—choose pure vanilla for best aroma.
- Whipped cream (1/2 cup): Stabilized whipped cream folded into the filling keeps it light; you can use store-bought whipped topping or whip heavy cream to soft peaks with a little sugar and vanilla.
Instructions
Make the crust: Combine 1 1/2 cups crushed gingerbread cookie crumbs with 1/4 cup melted unsalted butter in a bowl. Mix until the crumbs are evenly moistened and the texture resembles wet sand. Use a spoon or your fingers; if it’s too dry, add a teaspoon more melted butter. Press about 2 tablespoons of the mixture into the bottom of each serving cup, compacting firmly to create a level base. The crust should hold when tapped. Prepare the cream base: In a separate mixing bowl, beat 16 oz of softened cream cheese with 1/2 cup powdered sugar until smooth and free of lumps. Use an electric mixer on medium speed for 1–2 minutes, scraping the bowl sides with a spatula to ensure even texture. A smooth base prevents graininess in the final filling. Spice the filling: Add 1 teaspoon ground ginger, 1/2 teaspoon ground cinnamon, and 1 teaspoon vanilla extract to the cream cheese mixture. Mix on low speed just until combined; overbeating can incorporate too much air and change the mouthfeel. Taste and adjust spices gently if you prefer a bolder ginger or cinnamon note. Fold in whipped cream: Gently fold 1/2 cup whipped cream into the spiced cream cheese using a rubber spatula. Use a light hand and fold in thirds to preserve the aeration; the filling should be light and spreadable, not runny. Folding technique keeps the texture tender and scoopable. Assemble and chill: Spoon or pipe the cream cheese filling over the pressed crust in each cup, filling to about 3/4 full for a balanced crust-to-filling ratio. Smooth the tops with a spatula or the back of a spoon. Refrigerate the assembled cups for at least 2 hours, or up to 24 hours, to allow the filling to firm and the flavors to meld. Chill time also helps the crust set so it won’t crumble when bitten into. Garnish and serve: Just before serving, garnish with a dusting of ground cinnamon or extra whipped cream. You can also sprinkle a few crushed cookie crumbs or a slivered candied ginger piece for contrast. Serve chilled on a tray for a clean presentation.
You Must Know
- This dessert keeps well in the refrigerator for up to 3 days; for best texture, consume within 48 hours when the crust is most crisp.
- Freeze assembled cups for up to 1 month—wrap the tray tightly with plastic and thaw overnight in the refrigerator before serving to preserve texture.
- Each serving is rich: these cups are higher in fat due to cream cheese and butter, so portion size is ideal for an after-dinner treat.
- Swap to gluten-free ginger snaps and gluten-free cookie crumbs to make this suitable for gluten-sensitive guests.
- Chilling time is essential; skipping the 2-hour rest will result in a softer filling and a crumbly crust when served.
My favorite part is watching guests’ reactions when they taste the first spoonful—the contrast of a warm-spiced cookie base against a cool, silky filling always prompts appreciative "ahhs." On busy holidays I’ve prepped the crusts and filling separately the night before, then assembled and garnished just before the party. Little rituals like piping a small star of whipped cream on each cup make the presentation feel intentional and festive.
Storage Tips
Store the cups in an airtight container in the refrigerator to prevent the filling from absorbing other odors. If stacking, place a sheet of parchment between layers to avoid smudging the tops. For longer storage, freeze individual cups uncovered for 1–2 hours, then wrap each cup tightly in plastic wrap and tuck into a freezer-safe box—this reduces ice crystal formation. To reheat (if you prefer a slightly softer filling), thaw in the refrigerator overnight and bring to serving temperature for 20–30 minutes at room temperature before garnishing. Visual indicators of freshness include a smooth filling surface and a crust that retains some crunch.
Ingredient Substitutions
You can easily adapt this formula based on dietary preferences: use dairy-free cream cheese and vegan butter to convert the filling and crust; the texture will be slightly different but still delicious. For a gluten-free option, substitute gluten-free ginger snaps and ensure any powdered sugar is processed in a gluten-free facility. If you’d like a less sweet version, reduce the powdered sugar to 1/3 cup and add a teaspoon of lemon juice to brighten the filling. For more pronounced ginger flavor, add an extra 1/4 teaspoon of ground ginger or fold in a teaspoon of crystallized minced ginger.
Serving Suggestions
Serve these cups chilled as part of a dessert buffet or alongside hot beverages like mulled cider or coffee. Garnishes that elevate appearance include a small dollop of whipped cream, a sprinkle of extra cookie crumbs, a dusting of cinnamon, or a piece of candied ginger perched on top. For holiday gatherings, place cups on a decorated tray with rosemary sprigs and orange slices nearby for a festive vibe. They also pair nicely with a salted caramel drizzle or a spoonful of warm apple compote for contrast.
Cultural Background
Miniature chilled desserts like these have roots in the European tradition of layered sweets—combining cookies with cream fillings—adapted here to highlight gingerbread, a classic winter flavor in many Western kitchens. Gingerbread developed as a spiced bread and cookie in medieval Europe, popularized with molasses and ginger. Turning those spiced cookies into a crisp base for a creamy layer nods to trifle-like layered desserts while offering a modern, portable presentation that suits contemporary entertaining.
Seasonal Adaptations
In winter, emphasize warm spices by adding a pinch of nutmeg or cloves to the filling. For a spring variation, swap gingerbread crumbs for graham cracker crumbs and stir in a little lemon zest into the filling for brightness. During autumn, mix in a tablespoon of pumpkin puree and a dash of pumpkin spice to transition these cups into a pumpkin-ginger hybrid. Simple changes—like adding citrus zest, swapping cookie types, or drizzling seasonal syrups—let you customize the cups to holidays and weather without changing the method.
Meal Prep Tips
For easy entertaining, make the crumb bases and filling up to 24 hours ahead, storing separately in airtight containers. When ready to serve, press the pre-made crusts into cups and spoon or pipe the filling on top—this saves time and keeps the crust crisp. Use a piping bag with a large round tip for a neat, bakery-style top. Portion into 6–8 cups depending on your serving size; label and date containers if freezing. Pack garnishes separately to add right before serving for fresher presentation.
These no-bake gingerbread cheesecake cups are small in effort but big on charm: a lovely make-ahead option that invites variations and makes holiday entertaining easier. Try them once and you’ll have a new go-to that balances nostalgia with convenience.
Pro Tips
Press the crust firmly but not overly compacted to preserve a slight crunch.
Fold whipped cream in thirds to keep the filling light and airy without deflating it.
Room-temperature cream cheese yields the smoothest filling—beat until completely lump-free.
Chill assembled cups at least 2 hours; this helps the filling set and the crust bind.
Garnish just before serving to keep textures fresh and presentation neat.
This nourishing no-bake gingerbread cheesecake cups recipe is sure to be a staple in your kitchen. Enjoy every moist, high protein slice — it is perfect for breakfast or as a wholesome snack any time.
FAQs about Recipes
How long should I chill the cups?
Chill for at least 2 hours; overnight chilling yields a firmer filling and better sliceability.
Can I make these gluten-free?
Yes—use gluten-free ginger snaps and ensure other ingredients are gluten-free.
Tags
No-Bake Gingerbread Cheesecake Cups
This No-Bake Gingerbread Cheesecake Cups recipe makes perfectly juicy, tender, and flavorful steak every time! Serve with potatoes and a side salad for an unforgettable dinner in under 30 minutes.
Ingredients
Crust
Filling
Instructions
Combine crumbs and butter
Mix 1 1/2 cups gingerbread cookie crumbs with 1/4 cup melted unsalted butter until the texture resembles wet sand. Press into bottoms of serving cups to form an even crust.
Beat cream cheese and sugar
Beat 16 oz softened cream cheese with 1/2 cup powdered sugar until smooth, about 1–2 minutes with an electric mixer, scraping bowl sides to remove lumps.
Add spices and vanilla
Stir in 1 teaspoon ground ginger, 1/2 teaspoon ground cinnamon, and 1 teaspoon vanilla extract until evenly combined; avoid overbeating.
Fold in whipped cream
Gently fold 1/2 cup whipped cream into the cream cheese mixture in thirds to maintain a light texture without deflating the mixture.
Assemble and chill
Spoon or pipe the filling over the crust in each cup, chill for at least 2 hours to set, and garnish with extra whipped cream or a dusting of cinnamon before serving.
Last Step: Please leave a rating and comment letting us know how you liked this recipe! This helps our business to thrive and continue providing free, high-quality recipes for you.
Nutrition
Did You Make This?
Leave a comment & rating below or tag
@easywhiskrecipes on social media!
Categories:
You might also like...

Instant Pot Creamy Chicken and Rice
A quick and comforting one pot dinner of tender chicken, creamy rice, and vegetables cooked together in the Instant Pot for an easy weeknight meal.

Cinnamon Roll Pancake Stacks
Fluffy pancakes swirled with a warm cinnamon filling and finished with a silky cream cheese glaze. Perfect for weekend brunches and cozy mornings.

Caramel Apple Cheesecake Bars
Buttery graham crust, creamy cheesecake, spiced Granny Smith apples, crunchy streusel, and a ribbon of homemade caramel — perfect dessert bars for gatherings.
Did You Make This?
Leave a comment & rating below or tag @easywhiskrecipes on social media!
Rate This Recipe
Share This Recipe
Enjoyed this recipe? Share it with friends and family, and don't forget to leave a review!
Comments (1)
This recipe looks amazing! Can't wait to try it.
Comments are stored locally in your browser. Server comments are displayed alongside your local comments.

Hi, I'm Sophie!
What's Popular

30-Minute Meals!
Join to receive our email series which contains a round-up of some of our quick and easy family favorite recipes.