
Christmas Present Brownies

Fudgy, ribbon-decorated brownies made to look like little wrapped gifts — perfect for holiday baking and edible presents.
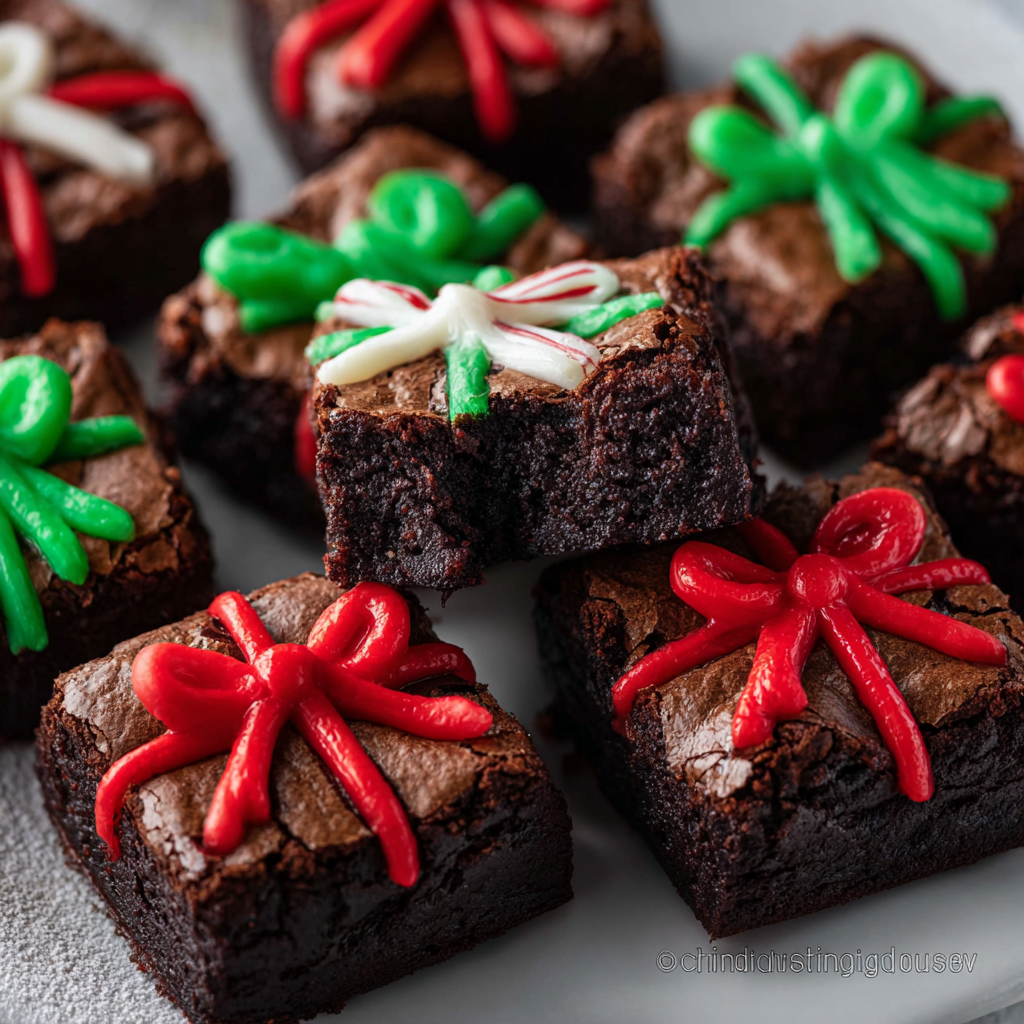
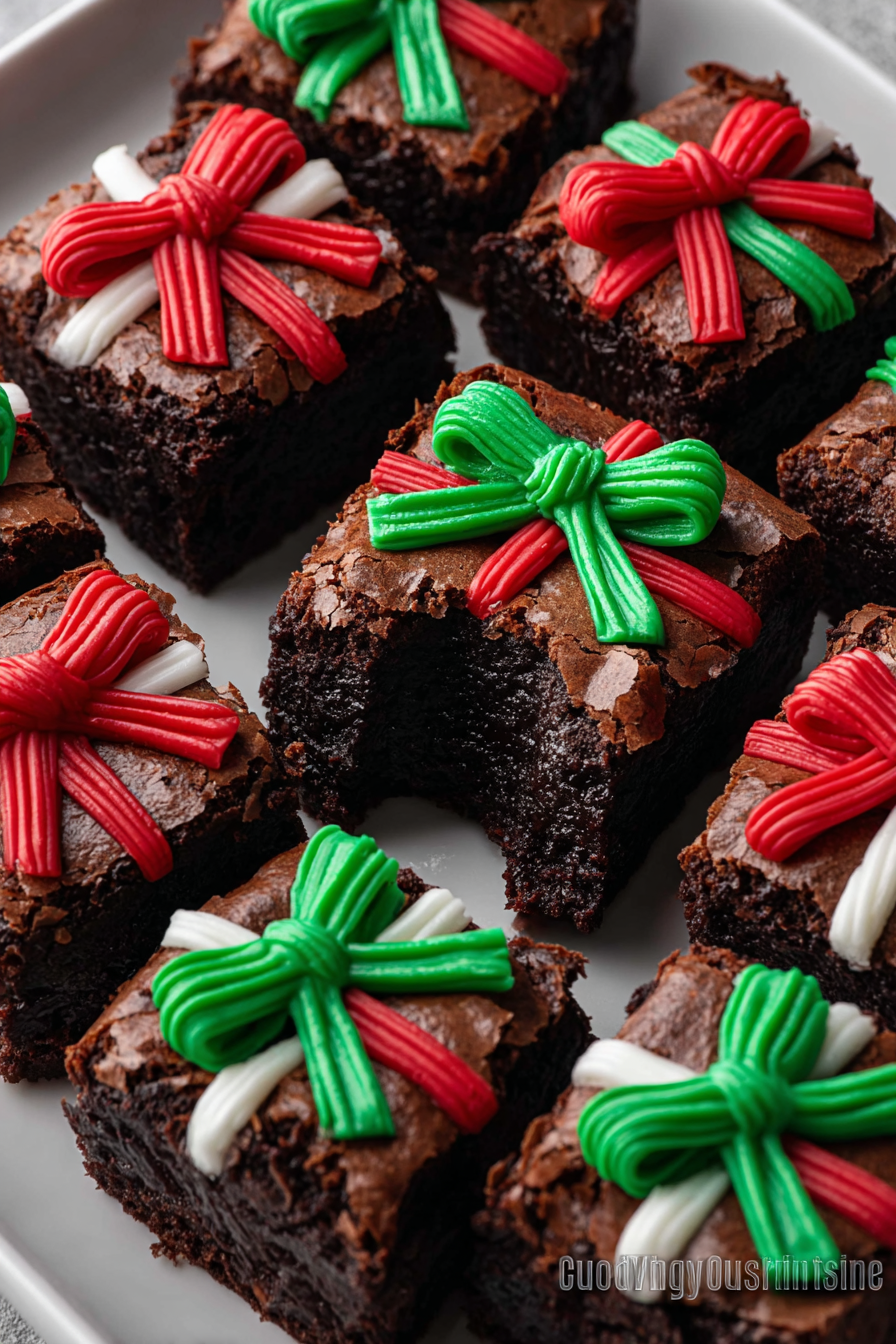
This batch of Christmas Present Brownies is the kind of holiday baking that became a tradition the first winter I tried it: simple ingredients, quick method, and a joyful finish that makes even the most ordinary brownie feel like a thoughtful gift. I first made these one December when I needed something festive to bring to a neighbors' cookie swap but had only pantry staples on hand. The ribbons — created from red, green, and white candy melts — transformed humble fudgy squares into miniature presents that disappeared faster than I could box them. The texture is rich and slightly chewy at the center with a glossy top, and the candy ribbons add a playful snap and color contrast that kids and adults alike comment on.
What I love most about this version is its approachable balance: it relies on straightforward technique rather than complex ingredients, and the decorations allow you to dial the holiday vibe up or down. The batter is silky because the sugar is whisked into warm melted butter, which yields a glossy, slightly dense crumb once baked. Decorating is forgiving — no need for perfect piping skills — so it's a great project to do with kids or to prep while watching a holiday movie. These squares travel well, stack neatly in a box, and make a charming edible gift when topped with tiny candy bows or festive sprinkles.
Why You'll Love This Recipe
- Fudgy texture achieved with melted butter and a minimal amount of flour for an intense chocolate bite that feels indulgent without fuss.
- Quick to prepare: active time is under 20 minutes and the oven does most of the work — ready in about 50 minutes total.
- Uses pantry staples: all-purpose flour, cocoa, sugar and eggs are likely already in your kitchen, making it perfect for last-minute baking.
- Decorations make each square look like a wrapped present — great for gifting or serving at holiday parties and cookie exchanges.
- Flexible: add chocolate chips for extra gooey pockets, or swap candy melts for ganache if you prefer a more elegant finish.
- Make-ahead friendly: bake earlier in the day and decorate before guests arrive, or freeze uncut for longer storage.
My family’s reaction the first year I brought these to a holiday brunch was priceless — adults admired the presentation while the kids immediately hunted for the brightest bows. Over the years I’ve learned small technique shifts (cool completely before cutting; use parchment overhang) that make serving and gifting easier. These little brownies reliably steal the show at gatherings without requiring hours in the kitchen.
Ingredients
- Unsalted butter (1 cup / 2 sticks): Use a good-quality butter like Plugrá or Kerrygold for flavor; melting it and whisking in sugar yields a glossy batter and contributes to a tender, fudgy crumb.
- Granulated sugar (2 cups): Standard granulated sugar gives structure and that classic brownie sheen when combined with melted butter — avoid substituting liquid sweeteners without recalibrating the recipe.
- Large eggs (4): Room temperature eggs emulsify the batter and add richness; if cold, let them sit for 15–20 minutes to blend more easily.
- Vanilla extract (1 teaspoon): Pure vanilla enhances the chocolate flavor; use real extract rather than imitation when possible.
- All-purpose flour (1 cup): Measure by spooning into the cup then leveling off to avoid a dry, cakey result — this relatively small amount keeps the brownies dense.
- Unsweetened cocoa powder (1 cup): Dutch-process or natural will both work but affect color and flavor slightly — Dutch-process yields a deeper color and smoother flavor.
- Baking powder (1/2 teaspoon) & salt (1/4 teaspoon): Small amounts help control rise and balance sweetness; don’t skip the salt.
- Semi-sweet chocolate chips (1 cup, optional): Folded in for extra pockets of melted chocolate — use Ghirardelli or Nestlé Toll House for reliable results.
- Red, green, and white candy melts: For decorating ribbons; they melt cleanly and set firm at room temperature.
- Mini candy bows or holiday sprinkles: Optional embellishments to make each square look like a tiny present.
Instructions
Preheat and prepare pan: Preheat the oven to 350°F (175°C). Line a 9×13-inch baking pan with parchment paper leaving an overhang on two sides — this makes it easy to lift the cooled slab out for cutting. Grease the pan lightly if your parchment is thin so it doesn’t shift during baking. Melt butter and combine with sugar: In a medium saucepan over low heat, melt the butter until fully liquid. Remove from heat and whisk in the granulated sugar until the mixture looks smooth and slightly glossy. Allow the mixture to cool for 2–3 minutes; it should be warm, not hot, before you add eggs to avoid cooking them. Add eggs and vanilla: Whisk in the eggs, one at a time, beating until each is fully incorporated and the mixture becomes thick and shiny — this step builds structure and creates a fudgy texture. Stir in the vanilla extract. Sift dry ingredients: Sift together the flour, cocoa powder, baking powder, and salt into a separate bowl to remove lumps and ensure even distribution. Gradually fold the dry ingredients into the wet mixture with a rubber spatula until just combined; overmixing will develop gluten and dry out the bars. Fold in chips and transfer: If using, gently fold in the semi-sweet chocolate chips until they are evenly dispersed. Pour the batter into the prepared pan and smooth the surface with an offset spatula so it bakes evenly. Bake and test for doneness: Bake in the center of the oven for 30–35 minutes. A toothpick inserted in the center should come out with a few moist crumbs attached — not wet batter. The top should be set with a slight glossy crackle. Remove from oven and let cool completely in the pan on a wire rack before decorating; cooling allows the crumb to stabilize for cleaner cuts. Cut and decorate: Lift the cooled brownie slab out using the parchment overhang and transfer to a cutting board. Cut into even squares (I like 24 pieces). Melt candy melts in separate microwave-safe bowls in 15-second bursts, stirring between bursts until smooth. Pipe or drizzle in crisscross lines to mimic ribbon and add tiny candy bows or sprinkles while the melts are still soft.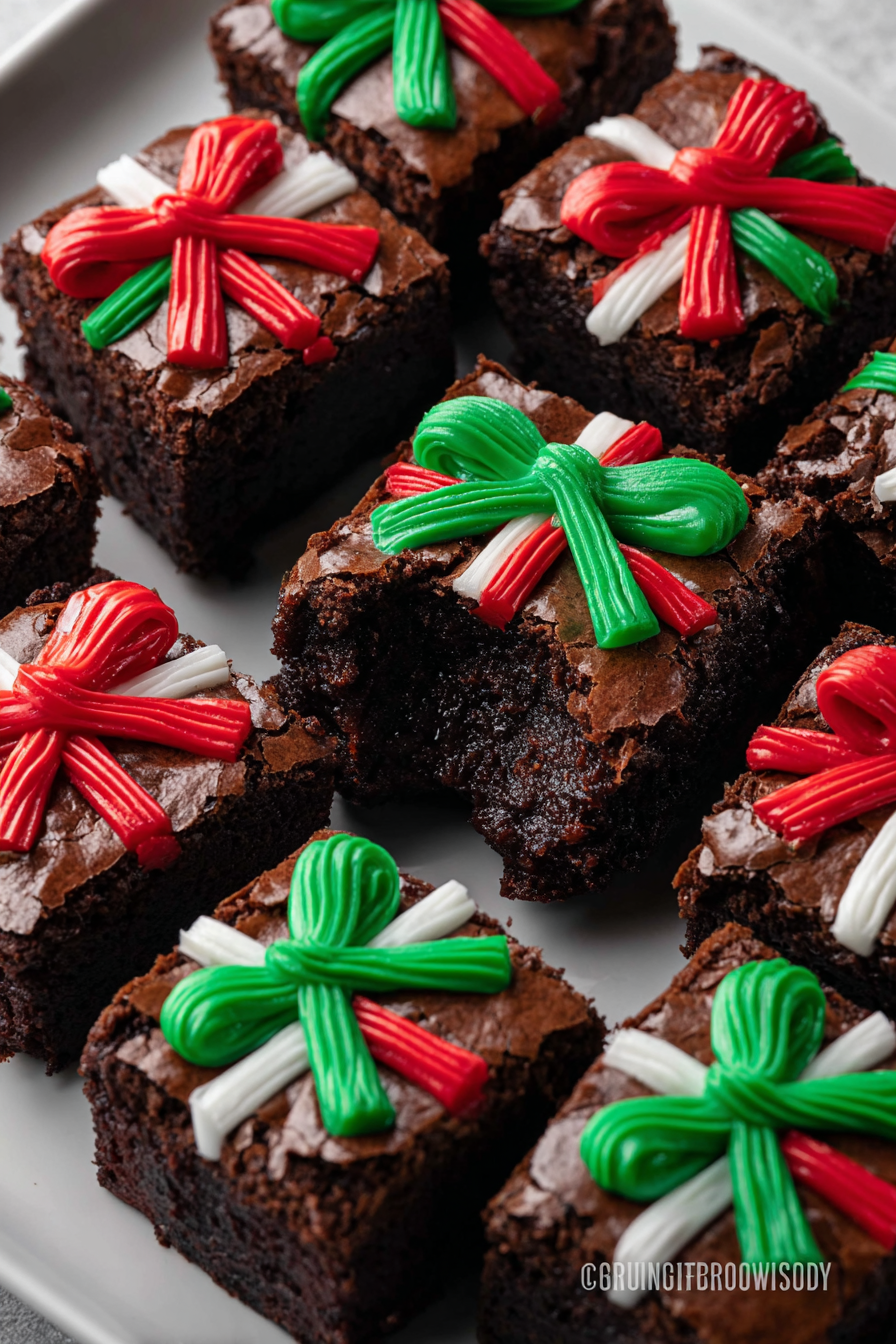
You Must Know
- These squares are rich and best cut after cooling completely; warm brownies will crumble and smear the decorations.
- They freeze well: wrap tightly and freeze uncut for up to 3 months; thaw in the refrigerator before decorating.
- High in energy and sugar — a small square is satisfying. Store at room temperature in an airtight container for up to 4 days.
- Decorations set at room temperature in 10–20 minutes; refrigeration speeds this to 10–15 minutes but can cause condensation when returned to room temperature.
My favorite part of this method is how forgiving the decorations are: imperfect lines read as handmade charm, and the ribbons are a simple way to elevate a familiar treat into something special. At family gatherings, these brownies become the most requested dessert — people treat them like tiny, edible gifts and always ask for the recipe.
Storage Tips
Store cooled and decorated squares in an airtight container at room temperature for up to four days; separate layers with parchment to prevent sticking. For longer storage, freeze the uncut slab wrapped tightly in plastic and foil for up to three months. Thaw overnight in the refrigerator before unwrapping and cutting; if you prefer to freeze already cut pieces, flash-freeze them on a tray for an hour then transfer to a freezer-safe container to avoid smudging decorations. Reheat briefly in a low oven (250°F / 120°C) for 5–7 minutes if you want a warm, gooey bite, but beware this will soften candy decorations.
Ingredient Substitutions
If you need to adapt ingredients, swap the semi-sweet chips for dark chocolate chips for a less sweet bar, or use milk chocolate for a sweeter profile. To make the bars gluten-free, substitute 1:1 gluten-free all-purpose flour and add a tablespoon of extra cocoa powder to retain structure. For dairy-free versions, use a vegan butter and dairy-free chocolate chips — the texture will be slightly different but still rich. If you’re avoiding refined sugar, experiment with coconut sugar at a 1:1 ratio; note the color will be darker and the top less glossy.
Serving Suggestions
Present the squares on a decorative platter lined with parchment or place individually in small clear boxes for gifting. Pair them with lightly whipped cream or a scoop of vanilla ice cream to balance the richness. For a grown-up dessert, serve alongside spiced coffee or a glass of tawny port. Garnish with a dusting of cocoa powder, a few flaky sea salt crystals, or edible gold dust for a festive finish. These are ideal for cookie exchanges, bake sales, or arranged on a holiday dessert board with cookies and candied nuts.
Cultural Background
Brownies are a classic of American baking, believed to have originated in the late 19th to early 20th century as a portable, indulgent cake-like bar. Variations have proliferated — from cakey to fudgy — and decorating them as tiny “presents” is a modern, whimsical take that blends traditional baking with holiday craft. This approach reflects a larger trend of turning simple confections into themed party fare, making them both visually appealing and easy to distribute at celebrations.
Seasonal Adaptations
To adapt across seasons, change the candy melt colors and embellishments: pastel melts and candy eggs make them spring-appropriate, while orange and brown melts with toasted pecans suit autumn. For a winter twist beyond Christmas, top with crushed peppermint and use white candy melts for a snowy effect. Spiced variations can include a pinch of cinnamon or espresso powder in the batter to deepen flavor for cooler months.
Meal Prep Tips
For efficient holiday prep, bake multiple slabs and freeze them uncut. On the day you need to serve, thaw in the refrigerator, slice, and decorate — the melts harden faster than you might expect so you can assemble trays shortly before guests arrive. Use a sharp knife warmed under hot water and wiped dry between cuts for clean edges. If packaging as gifts, include a small note with storage instructions to help recipients enjoy them at their best.
These little gift-like squares are a reminder that small, thoughtful touches — like a ribbon of colored candy — can turn a familiar favorite into something truly memorable. Whether you bake them for family, friends, or a festive get-together, they’re a joyful way to share holiday warmth.
Pro Tips
Cool the slab completely before cutting to get clean squares and avoid smudging decorations.
Use parchment paper with an overhang for easy removal and neater edges when slicing.
Warm your knife under hot water and dry it before each cut for tidy pieces.
If candy melts thicken, microwave in short 10-15 second bursts and stir well between bursts.
Freeze the uncut slab if you want to bake ahead; thaw in the refrigerator before decorating.
This nourishing christmas present brownies recipe is sure to be a staple in your kitchen. Enjoy every moist, high protein slice — it is perfect for breakfast or as a wholesome snack any time.
Tags
Christmas Present Brownies
This Christmas Present Brownies recipe makes perfectly juicy, tender, and flavorful steak every time! Serve with potatoes and a side salad for an unforgettable dinner in under 30 minutes.
Ingredients
Main
Decoration
Instructions
Preheat and Line Pan
Preheat oven to 350°F (175°C). Line a 9x13-inch pan with parchment leaving an overhang for easy removal; lightly grease if needed.
Melt Butter and Combine with Sugar
Melt 1 cup (2 sticks) butter in a saucepan over low heat. Remove from heat and whisk in 2 cups sugar until smooth and glossy; cool slightly.
Add Eggs and Vanilla
Whisk in 4 room-temperature eggs one at a time until the mixture becomes thick and shiny, then stir in 1 teaspoon vanilla.
Sift Dry Ingredients and Fold
Sift together 1 cup flour, 1 cup cocoa powder, 1/2 teaspoon baking powder, and 1/4 teaspoon salt. Fold into wet mixture gently until just combined to avoid overworking.
Add Chocolate Chips and Bake
Fold in 1 cup semi-sweet chips if using. Pour batter into pan, smooth top, and bake 30–35 minutes until a toothpick shows moist crumbs. Cool completely.
Cut and Decorate
Lift cooled slab using parchment, cut into 24 squares. Melt candy melts separately and drizzle or pipe to form ribbons; top with mini bows or sprinkles and let set.
Last Step: Please leave a rating and comment letting us know how you liked this recipe! This helps our business to thrive and continue providing free, high-quality recipes for you.
Nutrition
Did You Make This?
Leave a comment & rating below or tag
@easywhiskrecipes on social media!
Categories:
You might also like...

Instant Pot Creamy Chicken and Rice
A quick and comforting one pot dinner of tender chicken, creamy rice, and vegetables cooked together in the Instant Pot for an easy weeknight meal.

Cinnamon Roll Pancake Stacks
Fluffy pancakes swirled with a warm cinnamon filling and finished with a silky cream cheese glaze. Perfect for weekend brunches and cozy mornings.

Caramel Apple Cheesecake Bars
Buttery graham crust, creamy cheesecake, spiced Granny Smith apples, crunchy streusel, and a ribbon of homemade caramel — perfect dessert bars for gatherings.
Did You Make This?
Leave a comment & rating below or tag @easywhiskrecipes on social media!
Rate This Recipe
Share This Recipe
Enjoyed this recipe? Share it with friends and family, and don't forget to leave a review!
Comments (1)
This recipe looks amazing! Can't wait to try it.
Comments are stored locally in your browser. Server comments are displayed alongside your local comments.

Hi, I'm Sophie!
What's Popular

30-Minute Meals!
Join to receive our email series which contains a round-up of some of our quick and easy family favorite recipes.