
Cheesy Pepperoni Pizza Roll-Ups

Golden, gooey roll-ups stuffed with melted mozzarella, zesty pizza sauce, and plenty of pepperoni—an easy crowd-pleaser ready in about 20 minutes.

This recipe for Cheesy Pepperoni Pizza Roll-Ups has been my go-to for busy weeknights and last-minute guests. I first put these together on a rainy Saturday afternoon when I wanted the spirit of pizza without the wait for dough to rise or the hassle of a pan of sauce. The combination of warm flour tortillas, bright pizza sauce, bubbling mozzarella, and that familiar pepperoni snap turned a simple pantry raid into a recipe that everyone in the house now asks for. The texture balance of a soft tortilla exterior and molten cheese inside makes every bite comforting and almost nostalgic—like a handheld pizza that’s faster and easier to eat.
I discovered this technique by adapting a childhood favorite, and it stuck because it scales easily and travels well. It’s the kind of thing you can assemble with kids at the counter, because the steps are repetitive and forgiving. I love the contrast between the sauce’s acidity and the pepperoni’s savory fat, and the light herb brush on top gives a restaurant-quality finish. These roll-ups are perfect for lazy lunches, TV-night snacks, or an impromptu appetizer when friends pop in. They’re quick to make, forgiving with substitutions, and endlessly adaptable depending on what you have on hand.
Why You'll Love This Recipe
- Ready in about 20 minutes from start to finish, so they’re perfect for weeknights and after-school snacks.
- Uses simple pantry and fridge staples—flour tortillas, jarred pizza sauce, shredded mozzarella, and pepperoni—no kneading, no proofing.
- Make-ahead friendly: assemble, refrigerate, and bake later, or freeze cooked roll-ups for quick reheating.
- Kid-friendly and customizable: swap the pepperoni for cooked chicken, ham, or veggies to suit dietary needs.
- Small-batch friendly: the recipe scales from one to a dozen roll-ups with no loss of texture or flavor.
- Minimal cleanup—one baking pan and a cutting board—making it ideal for quick entertaining.
Family members always react the same way: that first pull-apart moment when the cheese strings stretch is met with delighted groans. Once I started keeping the ingredients on hand, these roll-ups became my fallback for everything from impromptu game nights to packing a warm lunch. They travel well in a lunchbox and heat up beautifully in a toaster oven or air fryer.
Ingredients
- Small flour tortillas (6): Choose soft, pliable tortillas about 6–8 inches in diameter. Fresh tortillas without cracks roll more easily; store-brand or local bakery varieties both work. If you prefer a thinner wrap, look for "soft taco" style tortillas.
- Pizza sauce (14 oz): A jarred pizza sauce or thick marinara provides the tangy base. I like a brand that lists simple ingredients—tomatoes, salt, basil—for bright flavor. If your sauce is very thin, simmer briefly to thicken.
- Shredded mozzarella (24 oz): Whole-milk mozzarella gives the best melt and stretch. Pre-shredded cheese is convenient, but shredding a block from the deli will melt slightly better because it lacks anti-caking agents.
- Pepperoni (80 slices): Use thin sliced pepperoni for an even distribution—about 4 slices per tortilla. Turkey pepperoni or sliced salami can be used to vary fat and flavor.
- Cooking oil (1 tbsp): Neutral oil like vegetable or canola is fine for brushing. Olive oil works too and adds a small flavor boost.
- Garlic powder, Italian seasoning, garlic salt (each 1/2 tsp): A simple herb blend brushed on top gives the roll-ups that classic pizzeria finish. Adjust the garlic salt if you prefer lower sodium.
Instructions
Preheat the oven: Set your oven to 350°F (175°C). Lightly spray or oil a large baking pan so the roll-ups won’t stick. Preheating ensures even warming and proper melting of the cheese; a cold pan can cause the bottom to steam instead of crisp. Prepare each tortilla: Lay a soft tortilla flat on a clean surface. Spoon approximately 1 tablespoon of pizza sauce into the center and use the back of the spoon to spread a thin, even layer leaving a 1/2-inch border to prevent overflow while baking. Add the cheese: Scatter about 1/4 cup of shredded mozzarella over the sauce, covering the center. Use a generous but not excessive amount—too much cheese can leak during baking and make the roll-up messy. Layer the pepperoni: Place 4 slices of pepperoni on top of the cheese in a single layer. If you like extra pepperoni, tuck an additional slice or two, but be mindful of overfilling which makes rolling harder. Roll tightly: Fold one edge of the tortilla over the filling and roll away from you in a snug spiral, keeping the filling contained. Tucking any stray cheese or pepperoni inside will reduce spills and create neat, uniform rolls. Arrange and dress: Place each roll seam-side down in the prepared pan so they don’t unroll while baking. Lightly brush the tops with about 1 teaspoon of oil per roll to encourage browning. In a small bowl mix garlic powder, Italian seasoning, and garlic salt and sprinkle evenly over the tops. Bake until melty: Bake at 350°F for approximately 10 minutes, until the cheese is fully melted and the tortillas are warmed through. For a crispier finish, increase oven temperature to 400°F for the last 3–5 minutes or transfer to an air fryer at 400°F for 5–8 minutes. Watch closely to avoid burning the edges.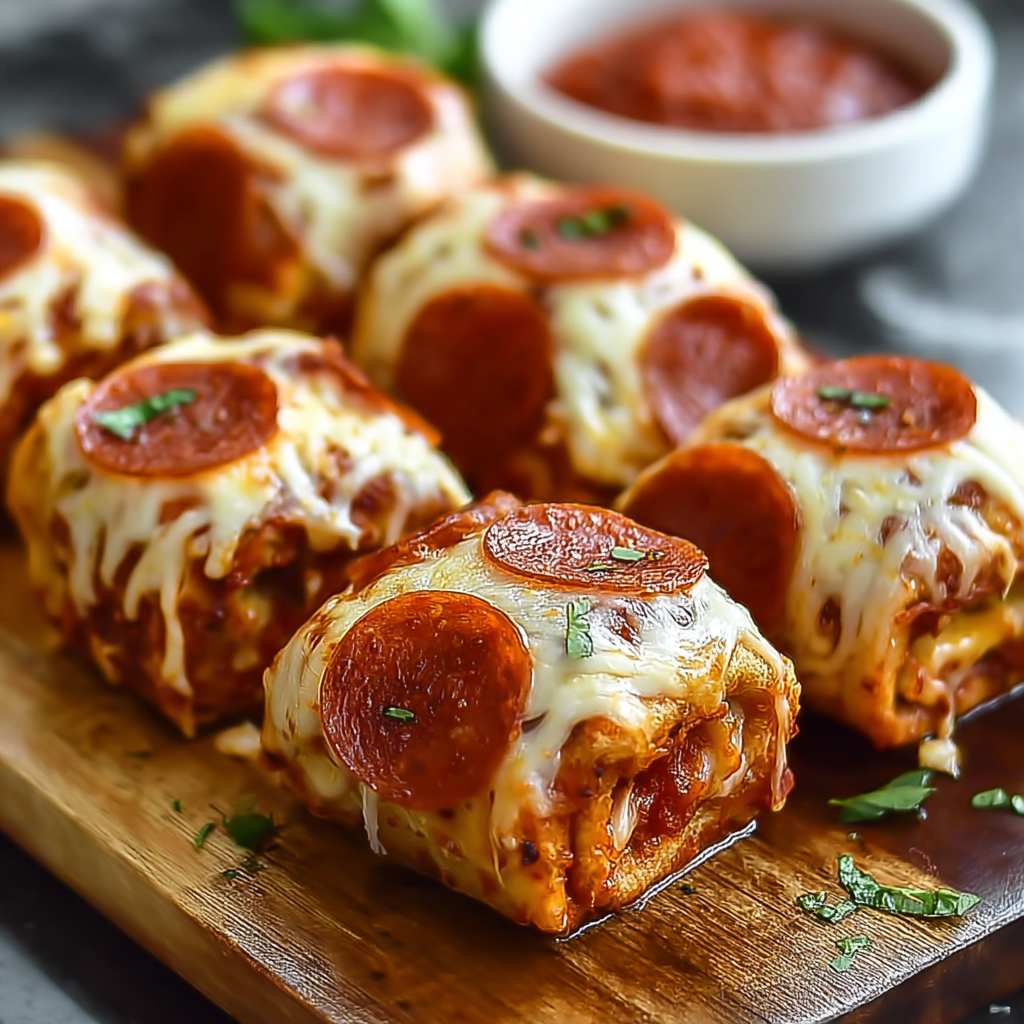
You Must Know
- These roll-ups freeze well for up to 3 months—assemble, flash-freeze on a tray, then transfer to a zipper bag. Reheat from frozen at 375°F for 12–15 minutes covered, then 3 minutes uncovered to crisp.
- Per roll-up, expect roughly 350–450 calories depending on cheese and pepperoni brand; they’re a protein-rich snack but fairly high in sodium.
- Store leftovers in an airtight container in the fridge for up to 3 days; reheat in a toaster oven for best texture.
- For gluten-free needs, use certified gluten-free tortillas and check labels on sauce and pepperoni.
My favorite part is the incongruity of something so simple tasting like a late-night pizzeria order. Once I made a double batch for a neighborhood gathering and came back to find none left—the plate was completely empty. Friends kept asking for the recipe and how the crisp edge paired with molten center was achieved; the trick is the light oil brush and a brief blast in a hotter oven at the end.

Storage Tips
Cool leftover roll-ups to room temperature before storing to prevent condensation and sogginess. Place in a single layer in an airtight container with a paper towel to absorb excess moisture; use within 3 days. For longer storage, flash-freeze on a tray until firm, then move to a freezer-safe bag for up to 3 months. Reheat frozen roll-ups in a preheated oven at 375°F for 12–15 minutes covered, then uncover for 2–3 minutes to regain crispness. Avoid microwaving if you want to preserve the tortilla texture—microwaves will soften the exterior and make them chewy.
Ingredient Substitutions
If you need to tweak the ingredients, several swaps work well. For a lower-fat option, choose part-skim mozzarella or turkey pepperoni; reduce oil brushing by half. Use whole-wheat or spinach tortillas for added fiber and a flavor twist; expect a firmer exterior requiring slightly less baking time. If you’re dairy-free, use a reliable plant-based shredded mozzarella and confirm the pepperoni alternative is vegan or omit cured meats and add roasted vegetables like bell pepper and mushroom for savory depth. Adjust seasoning proportions slightly when changing salty or sweet components.
Serving Suggestions
Serve these warm with a side bowl of extra pizza sauce for dipping and a simple green salad to balance the richness. For parties, slice each roll-up in half on the diagonal to create bite-sized pinwheels and arrange on a platter with fresh basil leaves and grated parmesan. They also pair nicely with roasted vegetables or a cold coleslaw for contrast. Garnish with a light drizzle of olive oil and a sprinkle of flaky sea salt just before serving to elevate the flavors.
Cultural Background
These roll-ups are a fusion of Italian-American flavors and practical American convenience cooking. They echo classic stromboli and calzone techniques—folding dough around fillings—but use tortillas for speed and portability. Pizza as a concept has long been adapted into handheld forms, from Neapolitan pocket sandwiches to American pizza rolls. This version leans into the quick-service tradition, offering the comforting flavors of pizza in a tidy, family-friendly format that reflects mid-century convenience cooking paired with modern ingredient quality.
Seasonal Adaptations
In summer, swap pepperoni for thinly sliced grilled zucchini, fresh cherry tomatoes, and basil with a light mozzarella for a brighter profile. In winter, add caramelized onions and roasted red peppers for a deeper, heartier flavor; these additions pair well with a smokier sauce. For holiday gatherings, incorporate festive herbs like thyme and rosemary into the oil brush and use a spicier pepperoni or smoked sausage to create a richer tasting roll-up that pairs well with a bold red or robust beer.
Meal Prep Tips
For meal prep, assemble a dozen roll-ups and store in a single layer in the fridge for up to 24 hours, then bake when ready. This keeps the tortillas from drying out. If prepping for the week, fully bake a batch and refrigerate; reheat individual portions in a toaster oven at 375°F for 5–7 minutes to crisp. Pack cooled roll-ups in microwave-safe containers with a small sauce cup for dipping when you need a portable lunch solution.
These roll-ups are proof that great flavor doesn’t require elaborate technique—just thoughtful seasoning, proper heating, and good-quality ingredients. Share them with friends, adapt them to your pantry, and enjoy the communal delight of pulling apart a warm, cheesy bite.
Pro Tips
Brush the tops lightly with oil to encourage even browning and a slightly crisp exterior.
Avoid overfilling each tortilla—a modest amount of cheese and four pepperoni slices roll more neatly.
If assembling ahead, refrigerate seam-side down to keep the rolls intact and bake from cold for a few extra minutes.
To freeze, flash-freeze on a tray before transferring to a sealed bag to prevent sticking.
This nourishing cheesy pepperoni pizza roll-ups recipe is sure to be a staple in your kitchen. Enjoy every moist, high protein slice — it is perfect for breakfast or as a wholesome snack any time.
Tags
Cheesy Pepperoni Pizza Roll-Ups
This Cheesy Pepperoni Pizza Roll-Ups recipe makes perfectly juicy, tender, and flavorful steak every time! Serve with potatoes and a side salad for an unforgettable dinner in under 30 minutes.
Ingredients
Main
Seasoning
Instructions
Preheat and prepare pan
Preheat oven to 350°F and lightly oil or spray a baking pan to prevent sticking.
Spread sauce on tortillas
Lay each tortilla flat and spread about 1 tablespoon of pizza sauce, leaving a 1/2-inch border to avoid overflow.
Add cheese and pepperoni
Sprinkle roughly 1/4 cup shredded mozzarella and place 4 pepperoni slices on top of the cheese.
Roll tightly
Roll the tortilla snugly to enclose filling and place seam-side down in the prepared pan.
Brush and season
Brush tops lightly with oil and sprinkle a mix of garlic powder, Italian seasoning, and garlic salt evenly over the roll-ups.
Bake until melty
Bake at 350°F for about 10 minutes until cheese is melted and roll-ups are heated through; for extra crispness, finish at 400°F for 3–5 minutes or air fry at 400°F for 5–8 minutes.
Last Step: Please leave a rating and comment letting us know how you liked this recipe! This helps our business to thrive and continue providing free, high-quality recipes for you.
Nutrition
Did You Make This?
Leave a comment & rating below or tag
@easywhiskrecipes on social media!
Categories:
You might also like...

Instant Pot Creamy Chicken and Rice
A quick and comforting one pot dinner of tender chicken, creamy rice, and vegetables cooked together in the Instant Pot for an easy weeknight meal.

Cinnamon Roll Pancake Stacks
Fluffy pancakes swirled with a warm cinnamon filling and finished with a silky cream cheese glaze. Perfect for weekend brunches and cozy mornings.

Caramel Apple Cheesecake Bars
Buttery graham crust, creamy cheesecake, spiced Granny Smith apples, crunchy streusel, and a ribbon of homemade caramel — perfect dessert bars for gatherings.
Did You Make This?
Leave a comment & rating below or tag @easywhiskrecipes on social media!
Rate This Recipe
Share This Recipe
Enjoyed this recipe? Share it with friends and family, and don't forget to leave a review!
Comments (1)
This recipe looks amazing! Can't wait to try it.
Comments are stored locally in your browser. Server comments are displayed alongside your local comments.

Hi, I'm Sophie!
What's Popular

30-Minute Meals!
Join to receive our email series which contains a round-up of some of our quick and easy family favorite recipes.